Alert Dialog trong Android
Một Dialog là một cửa sổ nhỏ gợi ý người dùng để ra quyết định hoặc nhập thông tin bổ sung.
Đôi khi trong ứng dụng của mình, có thể bạn muốn yêu cầu người dùng về lựa chọn quyết định yes hoặc no để phản hồi bất cứ action cụ thể nào, mà giữ nguyên Activity và không thay đổi màn hình hiện tại, bạn có thể sử dụng Alert Dialog.
Để tạo một Alert Dialog, bạn cần tạo một đối tượng AlertDialogBuilder mà là một lớp nội bộ của AlertDialog. Cú pháp như sau:
AlertDialog.Builder alertDialogBuilder = new AlertDialog.Builder(this);
Bây giờ bạn phải thiết lập nút yes hoặc no bởi sử dụng đối tượng của lớp AlertDialogBuilder. Cú pháp là:
alertDialogBuilder.setPositiveButton(CharSequence text, DialogInterface.OnClickListener listener)
alertDialogBuilder.setNegativeButton(CharSequence text, DialogInterface.OnClickListener listener)
Ngoài những phương thức này, bạn có thể sử dụng các hàm khác được cung cấp bởi lớp Builder để tùy chỉnh Alert Dialog của mình. Bảng dưới liệt kê các phương thức này:
| Stt | Phương thức type & Miêu tả |
|---|---|
| 1 |
setIcon(Drawable icon)
Phương thức này thiết lập icon của Alert Dialog |
| 2 |
setCancelable(boolean cancel able)
Phương thức này thiết lập thuộc tính mà Dialog là bị cancel hoặc không |
| 3 |
setMessage(CharSequence message)
Phương thức này thiết lập thông điệp để được hiển thị trong Alert Dialog |
| 4 |
setMultiChoiceItems(CharSequence[] items, boolean[] checkedItems, DialogInterface.OnMultiChoiceClickListener listener)
Phương thức này thiết lập danh sách item để được hiển thị trong Dialog. Tùy chọn sẽ được thông báo bởi Listener |
| 5 |
setOnCancelListener(DialogInterface.OnCancelListener onCancelListener)
Phương thức này thiết lập hàm callback sẽ được gọi nếu Dialog bị cancel |
| 6 |
setTitle(CharSequence title)
Phương thức này thiết lập Title xuất hiện trong Dialog |
Sau khi tạo và thiết lập Dialog Builder, bạn sẽ tạo một Alert Dialog bởi gọi phương thức create() của lớp Builder đó. Cú pháp là:
AlertDialog alertDialog = alertDialogBuilder.create();
alertDialog.show();
Điều này sẽ tạo Alert Dialog và sẽ hiển thị nó trên màn hình.
Dialog Fragment
Trước khi đi vào một ví dụ cụ thể, chúng ta cần biết về Dialog Fragment. Dialog Frament là một Fragment mà có thể hiển thị fragment trong hộp thoại Dialog.
public class DialogFragment extends DialogFragment {
   @Override
   public Dialog onCreateDialog(Bundle savedInstanceState) {
      // Use the Builder class for convenient dialog construction
      AlertDialog.Builder builder = new AlertDialog.Builder(getActivity());
      builder.setPositiveButton(R.string.fire, new DialogInterface.OnClickListener() {
         public void onClick(DialogInterface dialog, int id) {
            toast.makeText(this,"enter a text here",Toast.LENTH_SHORT).show();
         }
      })
      .setNegativeButton(R.string.cancel, new DialogInterface.OnClickListener() {
         public void onClick(DialogInterface dialog, int id) {
            finish();
         });
         // Create the AlertDialog object and return it
         return builder.create();
      }
   }
}
List dialog
Nó được sử dụng để hiển thị danh sách các mục trong một Dialog. Giả sử người dùng cần lựa chọn một item từ danh sách hoặc cần click vào item từ danh sách. Lúc này, chúng ta có thể sử dụng List Dialog như sau:
public Dialog onCreateDialog(Bundle savedInstanceState) {
   AlertDialog.Builder builder = new AlertDialog.Builder(getActivity());
   builder.setTitle(Pick a Color)

   .setItems(R.array.colors_array, new DialogInterface.OnClickListener() {
      public void onClick(DialogInterface dialog, int which) {
         // The 'which' argument contains the index position
         // of the selected item
      }
   });
   return builder.create();
}
List Dialog dạng Single-choice
Dạng này được sử dụng để thêm một danh sách dạng single-choice tới hộp Dialog. Chúng ta có thể kiểm tra hoặc không kiểm tra mỗi lựa chọn của người dùng.
public Dialog onCreateDialog(Bundle savedInstanceState) {
   mSelectedItems = new ArrayList();
   AlertDialog.Builder builder = new AlertDialog.Builder(getActivity());

   builder.setTitle("This is list choice dialog box");
   .setMultiChoiceItems(R.array.toppings, null,new DialogInterface.OnMultiChoiceClickListener() {
      @Override
      public void onClick(DialogInterface dialog, int which, boolean isChecked) {

         if (isChecked) {
            // If the user checked the item, add it to the selected items
            mSelectedItems.add(which);
         }

         else if (mSelectedItems.contains(which)) {
            // Else, if the item is already in the array, remove it
            mSelectedItems.remove(Integer.valueOf(which));
         }
      }
   })

   // Set the action buttons
   .setPositiveButton(R.string.ok, new DialogInterface.OnClickListener() {
      @Override
      public void onClick(DialogInterface dialog, int id) {
         // User clicked OK, so save the mSelectedItems results somewhere
         // or return them to the component that opened the dialog
         ...
      }
   })

   .setNegativeButton(R.string.cancel, new DialogInterface.OnClickListener() {
      @Override
      public void onClick(DialogInterface dialog, int id) {
         ...
      }
   });
   return builder.create();
}
Ví dụ
Ví dụ sau minh họa sự sử dụng của Alert Dialog trong Android.
Để thử nghiệm ví dụ, bạn cần chạy nó trên một màn hình mô phỏng Emulator hoặc một thiết bị thực sự.
Đây là nội dung đã sửa đổi của src/MainActivity.java
package com.example.sairamkrishna.myapplication;

import android.app.AlertDialog;
import android.content.DialogInterface;
import android.content.Intent;
import android.support.v7.app.ActionBarActivity;
import android.os.Bundle;
import android.view.Menu;
import android.view.MenuItem;
import android.view.View;
import android.widget.Toast;

public class MainActivity extends ActionBarActivity {
   @Override
   protected void onCreate(Bundle savedInstanceState) {
      super.onCreate(savedInstanceState);
      setContentView(R.layout.activity_main);
   }

   public void open(View view){
      AlertDialog.Builder alertDialogBuilder = new AlertDialog.Builder(this);
      alertDialogBuilder.setMessage("Are you sure,You wanted to make decision");

      alertDialogBuilder.setPositiveButton("yes", new DialogInterface.OnClickListener() {
         @Override
         public void onClick(DialogInterface arg0, int arg1) {
            Toast.makeText(MainActivity.this,"You clicked yes button",Toast.LENGTH_LONG).show();
         }
      });

      alertDialogBuilder.setNegativeButton("No",new DialogInterface.OnClickListener() {
         @Override
         public void onClick(DialogInterface dialog, int which) {
            finish();
         }
      });

      AlertDialog alertDialog = alertDialogBuilder.create();
      alertDialog.show();
   }

   @Override
   public boolean onCreateOptionsMenu(Menu menu) {
      // Inflate the menu; this adds items to the action bar if it is present.
      getMenuInflater().inflate(R.menu.menu_main, menu);
      return true;
   }

   @Override
   public boolean onOptionsItemSelected(MenuItem item) {

      // Handle action bar item clicks here. The action bar will
      // automatically handle clicks on the Home/Up button, so long
      // as you specify a parent activity in AndroidManifest.xml.

      int id = item.getItemId();

      //noinspection SimplifiableIfStatement
      if (id == R.id.action_settings) {
         return true;
      }
      return super.onOptionsItemSelected(item);
   }
}
Đây là nội dung đã sửa đổi của res/layout/activity_main.xml
<RelativeLayout xmlns:android="http://schemas.android.com/apk/res/android"
   xmlns:tools="http://schemas.android.com/tools" android:layout_width="match_parent"
   android:layout_height="match_parent" android:paddingLeft="@dimen/activity_horizontal_margin"
   android:paddingRight="@dimen/activity_horizontal_margin"
   android:paddingTop="@dimen/activity_vertical_margin"
   android:paddingBottom="@dimen/activity_vertical_margin"
   tools:context=".MainActivity">

   <TextView
      android:layout_width="wrap_content"
      android:layout_height="wrap_content"
      android:text="Alert Dialog"
      android:id="@+id/textView"
      android:textSize="35dp"
      android:layout_alignParentTop="true"
      android:layout_centerHorizontal="true" />

   <TextView
      android:layout_width="wrap_content"
      android:layout_height="wrap_content"
      android:text="Tutorialspoint"
      android:id="@+id/textView2"
      android:textColor="#ff3eff0f"
      android:textSize="35dp"
      android:layout_below="@+id/textView"
      android:layout_centerHorizontal="true" />

   <ImageView
      android:layout_width="wrap_content"
      android:layout_height="wrap_content"
      android:id="@+id/imageView"
      android:src="@drawable/logo"
      android:layout_below="@+id/textView2"
      android:layout_alignRight="@+id/textView2"
      android:layout_alignEnd="@+id/textView2"
      android:layout_alignLeft="@+id/textView"
      android:layout_alignStart="@+id/textView" />
   <Button
      android:layout_width="wrap_content"
      android:layout_height="wrap_content"
      android:text="Alert dialog"
      android:id="@+id/button"
      android:layout_below="@+id/imageView"
      android:layout_alignRight="@+id/textView2"
      android:layout_alignEnd="@+id/textView2"
      android:layout_marginTop="42dp"
      android:onClick="open"
      android:layout_alignLeft="@+id/imageView"
      android:layout_alignStart="@+id/imageView" />

</RelativeLayout>
Và đây là nội dung của Strings.xml
<resources>
    <string name="app_name">My Application</string>
    <string name="hello_world">Hello world!</string>
    <string name="action_settings">Settings</string>
</resources>
Tiếp theo là nội dung mặc định của AndroidManifest.xml
<?xml version="1.0" encoding="utf-8"?>
<manifest xmlns:android="http://schemas.android.com/apk/res/android"
   package="com.example.alertdialog"
   android:versionCode="1"
   android:versionName="1.0" >

   <application
      android:allowBackup="true"
      android:icon="@drawable/ic_launcher"
      android:label="@string/app_name"
      android:theme="@style/AppTheme" >

      <activity
         android:name="com.example.sairamkrishna.myapplication.MainActivity"
         android:label="@string/app_name" >

         <intent-filter>
            <action android:name="android.intent.action.MAIN" />
            <category android:name="android.intent.category.LAUNCHER" />
         </intent-filter>

      </activity>

   </application>
</manifest>
Chạy ứng dụng Android vừa tạo ở trên.
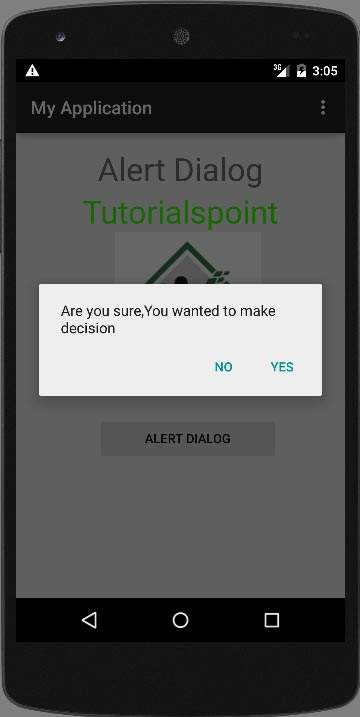
Chọn một tùy chọn và sau đó click vào đó. Nếu bạn chọn nút Yes thì kết quả như sau:
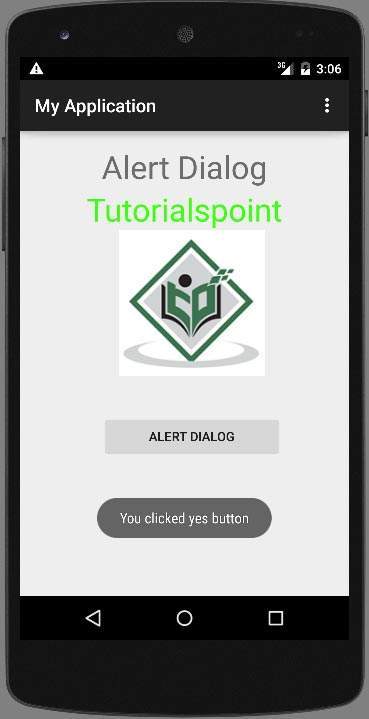
Nếu bạn chọn nút No, nó sẽ gọi finish() và sẽ đóng ứng dụng.
Đã có app VietJack trên điện thoại, giải bài tập SGK, SBT Soạn văn, Văn mẫu, Thi online, Bài giảng....miễn phí. Tải ngay ứng dụng trên Android và iOS.


Các bạn có thể mua thêm khóa học JAVA CORE ONLINE VÀ ỨNG DỤNG cực hay, giúp các bạn vượt qua các dự án trên trường và đi thực tập Java. Khóa học có giá chỉ 300K, nhằm ưu đãi, tạo điều kiện cho sinh viên cho thể mua khóa học.
Nội dung khóa học gồm 16 chuơng và 100 video cực hay, học trực tiếp tại https://www.udemy.com/tu-tin-di-lam-voi-kien-thuc-ve-java-core-toan-tap/ Bạn nào có nhu cầu mua, inbox trực tiếp a Tuyền, cựu sinh viên Bách Khoa K53, fb: https://www.facebook.com/tuyen.vietjack
Follow facebook cá nhân Nguyễn Thanh Tuyền https://www.facebook.com/tuyen.vietjack để tiếp tục theo dõi các loạt bài mới nhất về Java,C,C++,Javascript,HTML,Python,Database,Mobile.... mới nhất của chúng tôi.
Bài học Angular phổ biến tại vietjack.com: