
Location trong Android
Location APIs trong Android giúp bạn dễ dàng xây dựng các ứng dụng nhận biết vị trí, mà không cần quan tâm tới chi tiết của vị trí công nghệ nằm dưới.
Việc này có thể thực hiện với sự giúp đỡ của Google Play Services, mà dễ dàng thêm các tính năng nhận biết vị trí cho ứng dụng bởi tự động dò tìm vị trí.
Chương này minh họa cho bạn cách sử dụng của Location Services trong ứng dụng để lấy vị trí hiện tại, cập nhật vị trí, tìm kiếm địa chỉ, …
Đối tượng Location trong Android
Đối tượng Location biểu diễn một vị trí địa lý mà có thể bao gồm kinh độ, vĩ đọ, timestamp, và thông tin khác như bề mặt, độ cao, ... Có một số phương thức quan trọng mà bạn có thể sử dụng với đối tượng Location để lấy thông tin cụ thể về vị trí:
| Stt. | Phương thức & Miêu tả |
|---|---|
| 1 |
float distanceTo(Location dest)
Trả về khoảng cách tương đối (đơn vị m) giữa vị trí này và vị trí đã cho |
| 2 |
float getAccuracy()
Lấy ước lượng chính xác của vị trí này (đơn vị m) |
| 3 |
double getAltitude()
Lấy cao độ nếu có sẵn, số m trên mực nước biển |
| 4 |
float getBearing()
Lấy bearing, đơn vị độ |
| 5 |
double getLatitude()
Lấy vĩ độ, đơn vị độ |
| 6 | double getLongitude()
Lây kinh độ, đơn vị độ |
| 7 | float getSpeed()
Lấy vận tốc nếu có sẵn, đơn vị m/s |
| 8 |
boolean hasAccuracy()
Là true nếu vị trí này có một độ chính xác |
| 9 |
boolean hasAltitude()
Là true nếu vị trí này có một cao độ |
| 10 |
boolean hasBearing()
Là true nếu vị trí này có một bearing |
| 11 |
boolean hasSpeed()
Là true nếu vị trí này có một vận độ |
| 12 |
void reset()
Xóa các nội dung của Location |
| 13 |
void setAccuracy(float accuracy)
Thiết lập ước lượng chính xác của vị trí này (đơn vị m) |
| 14 |
void setAltitude(double altitude)
Thiết lập cao độ (số m trên mực nước biển) |
| 15 |
void setBearing(float bearing)
Thiết lập bearing (đơn vị độ) |
| 16 |
void setLatitude(double latitude)
Thiết lập vĩ độ (đơn vị độ) |
| 17 |
void setLongitude(double longitude)
Thiết lập kinh độ (đơn vị độ) |
| 18 | void setSpeed(float speed)
Thiết lập vận tốc (m/s) |
| 19 |
String toString()
Trả về một chuỗi miêu tả ngắn gọn mà con người có thể hiểu về đối tượng này |
Lấy vị trí hiện tại
Để lấy vị trí hiện tại, tạo một đối tượng LocationClient kết nối nó với Location Services bởi sử dụng phương thức connect() và sau đó gọi phương thức getLastLocation() () của nó. Phương thức này trả về vị trí gần đây nhất trong mẫu đối tượngLocation chứa các tọa độ là kinh độ và vĩ độ và các thông tin khác như đã giải thích ở trên. Để có tính năng dựa trên Location trong Activity của bạn, bạn sẽ phải triển khai hai Interface là: −
GooglePlayServicesClient.ConnectionCallbacks
GooglePlayServicesClient.OnConnectionFailedListener
Các Interface này cung cấp các phương thức callback quan trọng được liệt kê dưới đây. Bạn sẽ cần triển khai chúng trong lớp Activity của mình. −
| Stt. | Callback Methods & Miêu tả |
|---|---|
| 1 |
abstract void onConnected(Bundle connectionHint)
Được gọi khi Location Service được kết nối với Location Client thành công. Bạn sẽ sử dụng phương thức connect() để kết nối với Location Client |
| 2 |
abstract void onDisconnected()
Được gọi khi Client bị ngắt kết nối. Bạn sẽ sử dụng phương thức disconnect() để ngắt kết nối từ Location Client |
| 3 |
abstract void onConnectionFailed(ConnectionResult result)
Được gọi khi có một lỗi kết nối giữa Client và Service |
Bạn nên tạo Location Client trong phương thức onCreate() của lớp Activity, sau đó kết nối nó trong onStart(), (), để mà Location Services duy trì vị trí hiện tại trong khi Activity của bạn là nhìn thấy. Bạn nên ngắt kết nối Client trong phương thức onStop(), để mà khi ứng dụng của bạn là không nhìn thấy, Location Services không duy trì vị trí hiện tại. Điều này giúp tiết kiệm pin.
Lấy vị trí đã cập nhật
Nếu bạn muốn có vị trí đã được cập nhật, thì ngoài các Interface đã đề cập ở trên, bạn sẽ cần triển khai thêm một Interface nữa là LocationListener. Interface này cung cấp phương thức callback sau, mà bạn sẽ cần để triển khai trong lớp Activity của mình: −
| Stt. | Phương thức & Miêu tả |
|---|---|
| 1 |
abstract void onLocationChanged(Location location)
Phương thức callback này được sử dụng để nhận các thông báo từ LocationClient khi vị trí đã thay đổi |
Location Quality of Service
Đối tượng LocationRequest được sử dụng để yêu cầu một Quality of Service (Qos) cho các cập nhật vị trí từ LocationClient. Dưới đây là một số phương thức bạn có thể sử dụng để xử lý QoS.
| Stt. | Phương thức & Miêu tả |
|---|---|
| 1 |
setExpirationDuration(long millis)
Thiết lập khoảng thời gian của yêu cầu này (giá trị mili giây) |
| 2 |
setExpirationTime(long millis)
Thiết lập thời gian hết hạn của yêu cầu, giá trị là mili giây kể từ khi boot |
| 3 |
setFastestInterval(long millis)
Thiết lập khoảng thời gian nhanh nhất cho các cập nhật vị trí, giá trị mili giây |
| 4 |
setInterval(long millis)
Thiết lập khoảng thời gian cho các cập nhật vị trí, giá trị mili giây |
| 5 |
setNumUpdates(int numUpdates)
Thiết lập số cập nhật vị trí |
| 6 |
setPriority(int priority)
Thiết lập độ ưu tiên của yêu cầu |
Bây giờ, ví dụ nếu ứng dụng của bạn muốn có vị trí có độ chính xác cao, thì bạn nên tạo một yêu cầu vị trí với setPriority(int)được thiết lập là PRIORITY_HIGH_ACCURACY vàsetInterval(long) được thiết lập là 5s. Bạn cũng có thể sử dụng khoảng thời gian lớn hơn và/hoặc các độ ưu tiên khác như PRIORITY_LOW_POWER cho yêu cầu có độ chính xác là "city" hoặc PRIORITY_BALANCED_POWER_ACCURACY cho độ chính xác là "block".
Activities should strongly consider removing all location request when entering the background (for example at onPause()), or at least swap the request to a larger interval and lower quality to save power consumption.
Hiển thị một địa chỉ của vị trí (Location Address)
Khi bạn có đối tượng Location bạn có thể sử dụng phương thức Geocoder.getFromLocation() để lấy một địa chỉ cho một kinh độ và vĩ độ đã cho. Phương thức này là đồng bộ hóa, và có thể tốn một lượng thời gian để nó làm việc, vì thế bạn nên gọi phương thức này từ phương thức doInBackground() của lớp AsyncTask .
Lớp AsyncTask để lấy một địa chỉ cho một kinh độ và vĩ độ đã cho. Phương thức này là đồng bộ hóa, và có thể tốn một lượng thời gian để nó làm việc, vì thế bạn nên gọi phương thức này từ phương thức doInBackground() của lớp AsyncTask.
Lớp AsyncTask phải được phân lớp để được sử dụng và lớp con sẽ ghi đèdoInBackground(các tham số) để thực hiện một tác vụ trong background và phương thức onPostExecute((kết quả) method is invoked on the UI thread after the background computation finishes and at the time to display the result. There is one more important method available in AyncTask which isđược triệu hồi trên UI Thread sau khi các tính toán ở background kết thúc và là lúc để hiển thị kết quả. AsyncTask có một phương thức quan trọng hơn đó là execute(các tham số), , phương thức này thực thi tác vụ với các tham số cụ thể.
Bạn theo dõi ví dụ sau để hiểu kỹ hơn cách chúng ta sử dụng AsyncTask trong bất cứ ứng dụng Android nào để làm việc trong background mà không cần quấy rầy đến main task.
Ví dụ
Ví dụ sau minh họa cách bạn sử dụng Location Services trong ứng dụng để lấy vị trí hiện tại và các địa chỉ tương đương của nó, …
Để thử nghiệm ví dụ này, bạn sẽ cần thiết bị Mobile thực sự được trang bị bởi Android OS mới nhất, nếu không bạn sẽ gặp khó khăn khi Emulator có thể không làm việc.
Cài đặt Google Play Services SDK
Trước khi có hỗ trợ trong ứng dụng Android của mình, bạn cần cài đặt Google Play Services SDK theo các bước sau: −
| Steps | Miêu tả |
|---|---|
| 1 | Chạy Android Studio IDE
|
| 2 | Tìm com.google.android.gms:play-services:6.5.87 hoặc phiên bản library cao hơn, phụ thuộc vào phiên bản Android đang sử dụng |
| 3 | Chọn Google Play Services và nhấn nút apply như hình dưới |
Tạo ứng dụng Android
| Bước | Miêu tả |
|---|---|
| 1 | Bạn sử dụng Android Studio IDE để tạo ứng dụng Android với tên là Tutorialspoint dưới một package com.example.Tutorialspoint. Trong khi tạo project này, đảm bảo Target SDK và Compile With ở trong phiên bản Android SDK mới nhất để sử dụng APIs cấp độ cao hơn |
| 2 | Thêm Google Play Service library trong project theo các bước đơn giản trên |
| 3 | Sửa đổi src/MainActivity.java file và thêm code cần thiết để lấy vị trí hiện tại và địa chỉ tương đương của nó |
| 4 | Sửa đổi file res/layout/activity_main.xml để thêm tất cả thành phần GUI để bao 3 button và hai text view để hiển thị vị trí/địa chỉ |
| 5 | Sửa đổi res/values/strings.xml để định nghĩa các giá trị hằng cần thiết |
| 6 | Sửa đổi AndroidManifest.xml như dưới đây |
| 7 | Chạy ứng dụng để chạy Android Emulator và kiểm tra kết quả các thay đổi đã thực hiện trong ứng dụng |
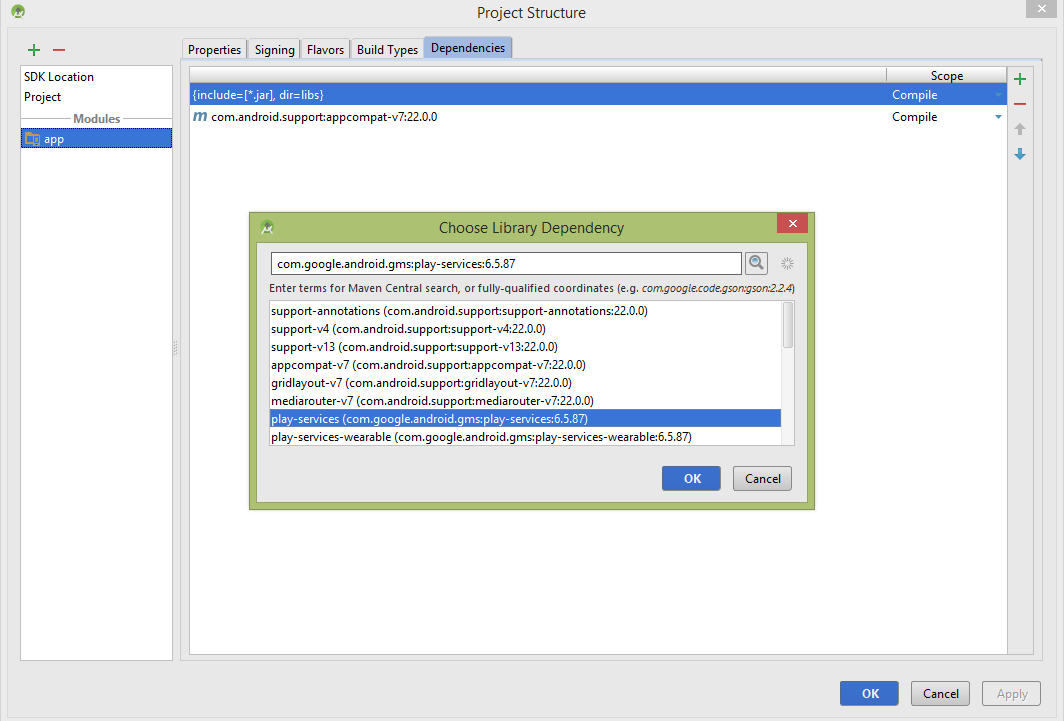
Thêm tham chiếu Google Play Service trong project. Nhấn vào > project structure > dependencies > và chọn + và sau đó tìm Google Play Services sẽ hiển thị com.google.android.gms:play-services:6.5.87 Nhấn nút Ok. Nó sẽ đóng cửa sổ Choose Library Dependency. Bạn phải đóng Project Structure bằng việc nhấn vào nút Apply.
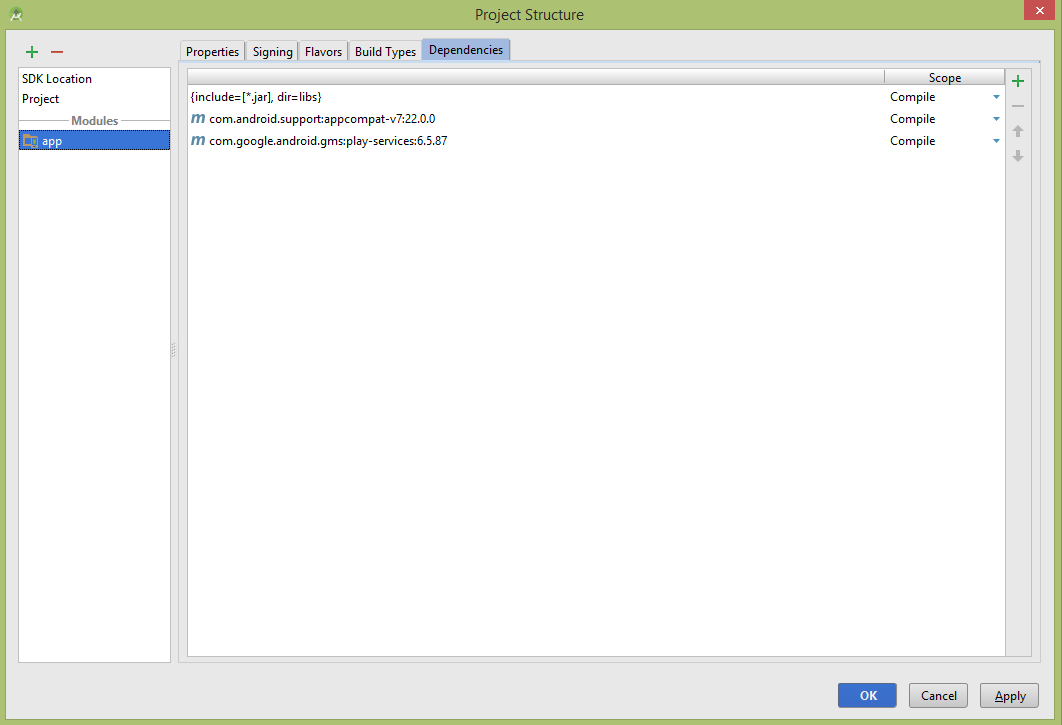
Hình trên minh họa việc thêm Google Play Services tới Project. Sau khi thêm, nó sẽ như sau:
Sau đây là nội dung của Main Activity file đã được sửa đổi: src/com.example.Tutorialspoint/MainActivity.java.
package com.example.Tutorialspoint;

import java.io.IOException;
import java.util.List;
import java.util.Locale;

import com.google.android.gms.common.ConnectionResult;
import com.google.android.gms.common.GooglePlayServicesClient;
import com.google.android.gms.location.LocationClient;

import android.content.Context;

import android.location.Address;
import android.location.Geocoder;
import android.location.Location;

import android.os.AsyncTask;
import android.os.Bundle;
import android.support.v4.app.FragmentActivity;

import android.util.Log;
import android.view.View;

import android.widget.Button;
import android.widget.TextView;
import android.widget.Toast;

public class MainActivity extends FragmentActivity implements
GooglePlayServicesClient.ConnectionCallbacks,
GooglePlayServicesClient.OnConnectionFailedListener
{
   LocationClient mLocationClient;
   private TextView addressLabel;
   private TextView locationLabel;
   private Button getLocationBtn;
   private Button disconnectBtn;
   private Button connectBtn;

   @Override
   protected void onCreate(Bundle savedInstanceState) {
      super.onCreate(savedInstanceState);
      setContentView(R.layout.activity_main);

      locationLabel = (TextView) findViewById(R.id.locationLabel);
      addressLabel = (TextView) findViewById(R.id.addressLabel);
      getLocationBtn = (Button) findViewById(R.id.getLocation);

      getLocationBtn.setOnClickListener(new View.OnClickListener() {
         public void onClick(View view) {
            displayCurrentLocation();
         }
      });

      disconnectBtn = (Button) findViewById(R.id.disconnect);
      disconnectBtn.setOnClickListener(new View.OnClickListener() {
         public void onClick(View view) {
            mLocationClient.disconnect();
            locationLabel.setText("Got disconnected....");
         }
      });

      connectBtn = (Button) findViewById(R.id.connect);
      connectBtn.setOnClickListener(new View.OnClickListener() {
         public void onClick(View view) {
            mLocationClient.connect();
            locationLabel.setText("Got connected....");
         }
      });

      // Create the LocationRequest object
      mLocationClient = new LocationClient(this, this, this);
   }

   @Override
   protected void onStart() {
      super.onStart();

      // Connect the client.
      mLocationClient.connect();
      locationLabel.setText("Got connected....");
   }

   @Override
   protected void onStop() {
      // Disconnect the client.
      mLocationClient.disconnect();
      super.onStop();
      locationLabel.setText("Got disconnected....");
   }

   @Override
   public void onConnected(Bundle dataBundle) {
      // Display the connection status
      Toast.makeText(this, "Connected", Toast.LENGTH_SHORT).show();
   }

   @Override
   public void onDisconnected() {
      // Display the connection status
      Toast.makeText(this, "Disconnected. Please re-connect.",Toast.LENGTH_SHORT).show();
   }

   @Override
   public void onConnectionFailed(ConnectionResult connectionResult) {
      // Display the error code on failure
      Toast.makeText(this, "Connection Failure : " + connectionResult.getErrorCode(),Toast.LENGTH_SHORT).show();
   }

   public void displayCurrentLocation() {
      // Get the current location's latitude & longitude
      Location currentLocation = mLocationClient.getLastLocation();
      String msg = "Current Location: " +
      Double.toString(currentLocation.getLatitude()) + "," +
      Double.toString(currentLocation.getLongitude());

      // Display the current location in the UI
      locationLabel.setText(msg);

      // To display the current address in the UI
      (new GetAddressTask(this)).execute(currentLocation);
   }
   /*
   * Following is a subclass of AsyncTask which has been used to get
   * address corresponding to the given latitude & longitude.
   */
   private class GetAddressTask extends AsyncTask<Location, Void, String>{
      Context mContext;

      public GetAddressTask(Context context) {
         super();
         mContext = context;
      }
      /*
      * When the task finishes, onPostExecute() displays the address.
      */
      @Override
      protected void onPostExecute(String address) {
         // Display the current address in the UI
         addressLabel.setText(address);
      }

      @Override
      protected String doInBackground(Location... params) {
         Geocoder geocoder =new Geocoder(mContext, Locale.getDefault());

         // Get the current location from the input parameter list
         Location loc = params[0];

         // Create a list to contain the result address
         <Address> addresses = null;
         try {
            addresses = geocoder.getFromLocation(loc.getLatitude(),loc.getLongitude(), 1);
         }

         catch (IOException e1) {
            Log.e("LocationSampleActivity",IO Exception in getFromLocation());
            e1.printStackTrace();
            return ("IO Exception trying to get address");
         }

         catch (IllegalArgumentException e2) {
            // Error message to post in the log
            String errorString = "Illegal arguments " +
            Double.toString(loc.getLatitude()) +" , " +Double.toString(loc.getLongitude()) +" passed to address service";
            Log.e("LocationSampleActivity", errorString);
            e2.printStackTrace();
            return errorString;
         }
         // If the reverse geocode returned an address
         if (addresses != null && addresses.size() > 0) {
            // Get the first address
            Address address = addresses.get(0);

            /*
            * Format the first line of address (if available),
            * city, and country name.
            */
            String addressText = String.format("%s, %s, %s");

            // If there's a street address, add it
            address.getMaxAddressLineIndex() > 0 ?
            address.getAddressLine(0) : "",

            // Locality is usually a city
            address.getLocality(),

            // The country of the address
            address.getCountryName());

            // Return the text
            return addressText;
         }
         else {
            return "No address found";
         }
      }
   }// AsyncTask class
}
Sau đây là nội dung của res/layout/activity_main.xml file −
<LinearLayout xmlns:android="http://schemas.android.com/apk/res/android"
   android:layout_width="fill_parent"
   android:layout_height="fill_parent"
   android:orientation="vertical" >

   <TextView android:id="@+id/textView1"
      android:layout_width="wrap_content"
      android:layout_height="wrap_content"
      android:text="Location Example"
      android:layout_alignParentTop="true"
      android:layout_centerHorizontal="true"
      android:textSize="30dp" />

   <TextView android:id="@+id/textView2"
      android:layout_width="wrap_content"
      android:layout_height="wrap_content"
      android:text="Tutorials point "
      android:textColor="#ff87ff09"
      android:textSize="30dp"
      android:layout_below="@+id/textView1"
      android:layout_alignRight="@+id/imageButton"
      android:layout_alignEnd="@+id/imageButton" />

   <ImageButton android:layout_width="wrap_content"
      android:layout_height="wrap_content"
      android:id="@+id/imageButton"
      android:src="@drawable/abc"
      android:layout_below="@+id/textView2"
      android:layout_centerHorizontal="true" />

   <Button android:id="@+id/getLocation"
      android:layout_width="fill_parent"
      android:layout_height="wrap_content"
      android:text="@string/get_location"/>

   <Button android:id="@+id/disconnect"
      android:layout_width="fill_parent"
      android:layout_height="wrap_content"
      android:text="@string/disconnect"/>

   <Button android:id="@+id/connect"
      android:layout_width="fill_parent"
      android:layout_height="wrap_content"
      android:text="@string/connect"/>

   <TextView
      android:id="@+id/locationLabel"
      android:layout_width="wrap_content"
      android:layout_height="wrap_content"/>

   <TextView
      android:id="@+id/addressLabel"
      android:layout_width="wrap_content"
      android:layout_height="wrap_content"/>

</LinearLayout>
Sau đây là nội dung của res/values/strings.xml để định nghĩa hai hằng:
<?xml version="1.0" encoding="utf-8"?>
<resources>
   <string name="app_name">Tutorialspoint</string>
   <string name="action_settings">Settings</string>
   <string name="hello_world">Hello world!</string>
   <string name="get_location">Get Location</string>
   <string name="disconnect">Disconnect Service</string>
   <string name="connect">Connect Service</string>
</resources>
Sau đây là nội dung mặc định của AndroidManifest.xml −
<?xml version="1.0" encoding="utf-8"?>
<manifest xmlns:android="http://schemas.android.com/apk/res/android"
   package="com.example.Tutorialspoint"
   android:versionCode="1"
   android:versionName="1.0" >
   <uses-permission android:name="android.permission.ACCESS_COARSE_LOCATION"/>

   <application
      android:allowBackup="true"
      android:icon="@drawable/ic_launcher"
      android:label="@string/app_name"
      android:theme="@style/AppTheme" >

      <activity
         android:name="com.example.Tutorialspoint.MainActivity"
         android:label="@string/app_name" >

         <intent-filter>
            <action android:name="android.intent.action.MAIN" />
            <category android:name="android.intent.category.LAUNCHER" />
         </intent-filter>

      </activity>
   </application>
</manifest>
Chạy ứng dụng Tutorialspoint. I assume that, you have connected your actual Android Mobile device with your computer. To run the app from Android Studio, open one of your project's activity files and click Run  icon from the toolbar. Before starting your application, Android studio installer will display following window to select an option where you want to run your Android application.
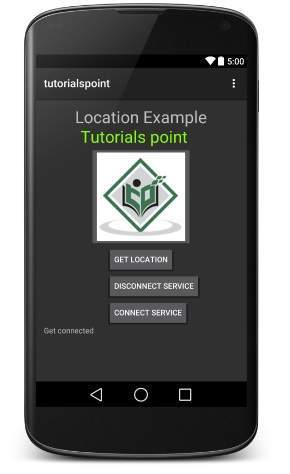
Bây giờ để xem vị trí, bạn chọn nút GET LOCATIOn sẽ hiển thị thông tin về vị trí như sau: −
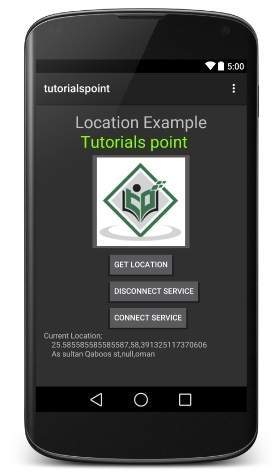
Bạn có thể thử ngắt kết nối với vị trí Client bằng việc nhấn nút Disconnect Service và sau đó kết nối nó bởi sử dụng nút Connect ServiceBạn cũng có thể sửa code để lấy các cập nhật vị trí như đã giải thích ở trên.
Đã có app VietJack trên điện thoại, giải bài tập SGK, SBT Soạn văn, Văn mẫu, Thi online, Bài giảng....miễn phí. Tải ngay ứng dụng trên Android và iOS.


Các bạn có thể mua thêm khóa học JAVA CORE ONLINE VÀ ỨNG DỤNG cực hay, giúp các bạn vượt qua các dự án trên trường và đi thực tập Java. Khóa học có giá chỉ 300K, nhằm ưu đãi, tạo điều kiện cho sinh viên cho thể mua khóa học.
Nội dung khóa học gồm 16 chuơng và 100 video cực hay, học trực tiếp tại https://www.udemy.com/tu-tin-di-lam-voi-kien-thuc-ve-java-core-toan-tap/ Bạn nào có nhu cầu mua, inbox trực tiếp a Tuyền, cựu sinh viên Bách Khoa K53, fb: https://www.facebook.com/tuyen.vietjack
Follow facebook cá nhân Nguyễn Thanh Tuyền https://www.facebook.com/tuyen.vietjack để tiếp tục theo dõi các loạt bài mới nhất về Java,C,C++,Javascript,HTML,Python,Database,Mobile.... mới nhất của chúng tôi.
Bài học Angular phổ biến tại vietjack.com:


 Giải bài tập SGK & SBT
 Tài liệu giáo viên
 Sách
Sách
 Khóa học
 Thi online
 Hỏi đáp