
Notification trong Android
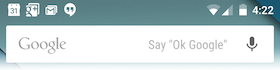
Một notification là một thông báo bạn có thể hiển thị tới người dùng. Thông báo này được hiển thị ở bên người giao diện UI thông thường của ứng dụng. Khi bạn nói cho hệ thống để thông báo một Notification, đầu tiên nó xuất hiện như một icon trong khu vực thông báo. Để thấy chi tiết về thông báo, người dùng mở Notification Drawer. Cả khu vực thông báo và drawer là các khu vực được điều khiển bởi hệ thống mà người dùng có thể quan sát bất cứ lúc nào.
Lớp Toast trong Android cung cấp một cách thức khá thuận tiện để hiển thị các alert cho người dùng, nhưng vấn đề là các alert này không tồn tại lâu, nghĩa là nó chỉ tồn tại trên màn hình một vài giây và sau đó biến mất.
Để xem chi tiết thông báo, bạn sẽ phải lựa chọn icon mà sẽ hiển thị Drawer có chi tiết về thông báo đó. Trong khi làm việc với Emulator (màn hình mô phỏng) với thiết bị thực sự, bạn sẽ phải click và kéo thanh trạng thái (status bar) để mở rộng nó, điều này sẽ cung cấp cho bạn chi tiết như hình dưới. Đây sẽ là cao 64 dp và được gọi là normal view.
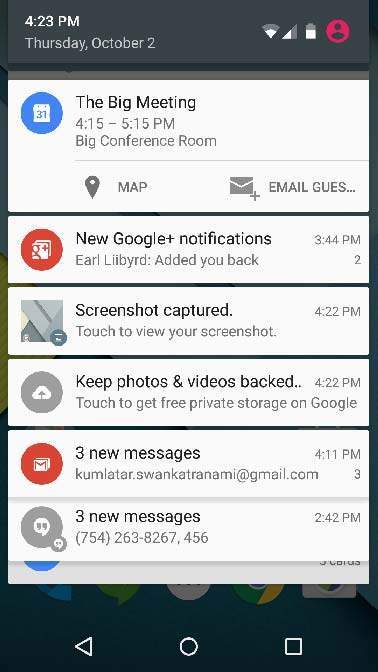
Form trên được mở rộng có thể có một Big View mà thêm thông tin chi tiết về thông báo. Bạn có thể thêm lên tới 6 dòng bổ sung trong thông báo.
Tạo và gửi thông báo trong Android
Bạn có một cách đơn giản để tạo một thông báo. Theo các bước sau trong ứng dụng để tạo một thông báo: −
Bước 1: Tạo Notification Builder
Trong bước đầu tiên, bạn cần tạo một Notification Builder bởi sử dụng phương thức NotificationCompat.Builder.build(). Bạn sẽ sử dụng Notification Builder để thiết lập các thuộc tính thông báo đa dạng như icon lớn, icon nhỏ, title, độ ưu tiên, …
NotificationCompat.Builder mBuilder = new NotificationCompat.Builder(this)
Bước 2: Thiết lập thuộc tính cho thông báo
Khi bạn có đối tượng Builder, bạn có thể thiết lập các thuộc tính thông báo của nó bởi sử dụng đối tượng Builder tùy theo yêu cầu của bạn. Nhưng bắt buộc ít nhất phải thiết lập như sau: −
Một icon nhỏ, được thiết lập bởi setSmallIcon()
Một title, được thiết lập bởi setContentTitle()
Text chi tiết, được thiết lập bởi setContentText()
mBuilder.setSmallIcon(R.drawable.notification_icon);
mBuilder.setContentTitle("Notification Alert, Click Me!");
mBuilder.setContentText("Hi, This is Android Notification Detail!");
Bạn có rất nhiều thuộc tính đa dạng có thể thiết lập cho thông báo. Để tìm hiểu thêm về chúng, bạn tham khảo Documentation về NotificationCompat.Builder.
Bước 3: Đính kèm các action
Đây là một bước tùy ý, và được thực hiện nếu bạn muốn gắn một action với thông báo. Một action cho phép người dùng trực tiếp từ một thông báo đi tới một Activity trong ứng dụng, ở đây họ có thể thấy một hoặc nhiều sự kiện hoặc thực hiện công việc khác.
Action được định nghĩa bởi một PendingIntent chứa một Intent mà bắt đầu một Activity trong ứng dụng của bạn. Để liên kết PendingIntent đó với một động tác, gọi phương thức thích hợp của NotificationCompat.Builder. Ví dụ, nếu bạn muốn bắt đầu Activity khi người dùng click vào phần text của Notification Drawer, bạn thêm PendingIntent bằng việc gọi phương thức setContentIntent().
Một đối tượng PendingIntent giúp bạn thực hiện một action trên ứng dụng, không quan tâm có hay không ứng dụng là đang chạy.
Chúng ta sử dụng đối tượng StackBuilder mà chứa một backstack cho Activity đã bắt đầu. Điều này đảm bảo rằng điều hướng từ Activity về màn hình chính.
Intent resultIntent = new Intent(this, ResultActivity.class);
TaskStackBuilder stackBuilder = TaskStackBuilder.create(this);
stackBuilder.addParentStack(ResultActivity.class);

// Adds the Intent that starts the Activity to the top of the stack
stackBuilder.addNextIntent(resultIntent);
PendingIntent resultPendingIntent = stackBuilder.getPendingIntent(0,PendingIntent.FLAG_UPDATE_CURRENT);
mBuilder.setContentIntent(resultPendingIntent);
Bước 4: Thông báo Notification
Cuối cùng, bạn truyền đối tượng Notification tới hệ thống bằng việc gọi NotificationManager.notify() để gửi thông báo. Đảm bảo rằng bạn đã gọi phương thức NotificationCompat.Builder.build() trên đối tượng Builder trước khi thông báo nó. Phương thức này kết hợp tất cả tùy chọn mà đã được thiết lập và trả về một đối tượng Notification mới .
NotificationManager mNotificationManager = (NotificationManager) getSystemService(Context.NOTIFICATION_SERVICE);

// notificationID allows you to update the notification later on.
mNotificationManager.notify(notificationID, mBuilder.build());
Lớp NotificationCompat.Builder
Lớp NotificationCompat.Builder cho phép điều khiển dễ dàng hơn thông qua tất cả flag, cũng như xây dựng các layout đặc trưng cho thông báo. Dưới đây là một số phương thức quan trọng và thường được sử dụng của lớp NotificationCompat.Builder:
| Stt. | Constants & Miêu tả |
|---|---|
| 1 |
Notification build()
Kết hợp tất cả tùy chọn mà đã được thiết lập và trả về một đối tượng Notification mới |
| 2 |
NotificationCompat.Builder setAutoCancel (boolean autoCancel)
Thiết lập flag này để thông báo tự động bị hủy khi người dùng click nó trong panel |
| 3 |
NotificationCompat.Builder setContent (RemoteViews views)
Cung cấp một Custom RemoteViews để sử dụng thay cho RemoteView chuẩn |
| 4 | NotificationCompat.Builder setContentInfo (CharSequence info)
Thiết lập khổ text lớn tại cạnh phải của Notification |
| 5 |
NotificationCompat.Builder setContentIntent (PendingIntent intent)
Cung cấp một PendingIntent để gửi khi thông báo được click |
| 6 | NotificationCompat.Builder setContentText (CharSequence text)
Thiết lập text (hàng thứ hai) của thông báo, trong một Notification chuẩn |
| 7 |
NotificationCompat.Builder setContentTitle (CharSequence title)
Thiết lập text (hàng thứ nhất) của thông báo, trong một Notification chuẩn |
| 8 |
NotificationCompat.Builder setDefaults (int defaults)
Thiết lập các tùy chọn thông báo mặc định mà sẽ được sử dụng |
| 9 | NotificationCompat.Builder setLargeIcon (Bitmap icon)
Thiết lập icon lớn mà được hiển thị trong thông báo |
| 10 | NotificationCompat.Builder setNumber (int number)
Thiết lập large number tại bên phải của Notification |
| 11 | NotificationCompat.Builder setOngoing (boolean ongoing)
Thiết lập xem có hay không đây là một thông báo phát ra từ hệ thống ra ngoài |
| 12 | NotificationCompat.Builder setSmallIcon (int icon)
Thiết lập small icon để sử dụng trong layout của thông báo |
| 13 |
NotificationCompat.Builder setStyle (NotificationCompat.Style style)
Thêm một style để được áp dụng tại builder time |
| 14 | NotificationCompat.Builder setTicker (CharSequence tickerText)
Thiết lập text mà được hiển thị trong status bar khi thông báo đến lần đầu |
| 15 | NotificationCompat.Builder setVibrate (long[] pattern)
Thiết lập vibration pattern để sử dụng |
| 16 |
NotificationCompat.Builder setWhen (long when)
Thiết lập thời gian mà sự kiện xảy ra. Các thông báo trong panel được xếp thứ tự theo thời gian này |
Ví dụ
Ví dụ sau minh họa tính năng của một thông báo trong Android bởi sử dụng một lớp NotificationCompat.Builder đã được giới thiệu trong Android 4.1.
| Bước | Miêu tả |
|---|---|
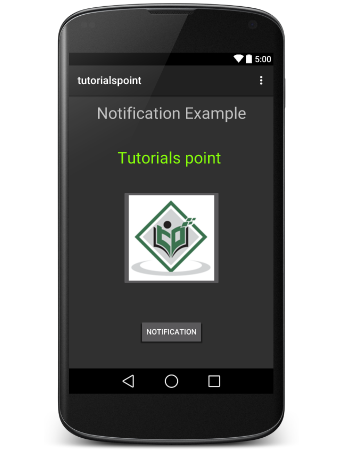
| 1 | Bạn sử dụng Android Studio IDE để tạo một ứng dụng Android với tên là tutorialspoint dưới một package com.example.notificationdemo. Trong khi tạo project này, đảm bảo bạn có Target SDK và Compile With là trong phiên bản Android SDK mới nhất để sử dụng APIs cấp độ cao hơn |
| 2 | Sửa đổi src/MainActivity.java file và thêm code để thông báo (""), nếu người dùng click vào button, nó sẽ gọi dịch vụ thông báo trong Android |
| 3 | Tạo một src/NotificationView.java mới, sẽ được sử dụng để hiển thị layout mới như là một phần của Activity mới mà sẽ được bắt đầu khi người dùng click vào bất cứ thông báo nào |
| 4 | Sửa đổi res/layout/activity_main.xml để thêm nút Notification trong layout |
| 5 | Tạo một res/layout/notification.xml mới. Nó sẽ được sử dụng như là layout file cho Activity mới mà sẽ bắt đầu khi người dùng click vào bất cứ thông báo nào |
| 6 | Không cần thiết thay đổi các hằng chuỗi mặc định. Android Studio sẽ để ý nó |
| 7 | Chạy ứng dụng để chạy Android Emulator và kiểm tra kết quả các thay đổi đã thực hiện trong ứng dụng |
Sau đây là nội dung của Main Activity file đã được sửa đổi: src/com.example.notificationdemo/MainActivity.java.
package com.example.notificationdemo;

import android.app.Notification;
import android.app.NotificationManager;
import android.app.PendingIntent;
import android.content.Intent;
import android.support.v7.app.ActionBarActivity;
import android.os.Bundle;
import android.view.Menu;
import android.view.MenuItem;
import android.view.View;
import android.widget.Button;

public class MainActivity extends ActionBarActivity {
   Button b1;
   @Override
   protected void onCreate(Bundle savedInstanceState) {
      super.onCreate(savedInstanceState);
      setContentView(R.layout.activity_main);

      b1=(Button)findViewById(R.id.button);
      b1.setOnClickListener(new View.OnClickListener() {
         @Override
         public void onClick(View v) {
            Notify("You've received new message");
         }
      });
   }
   private void Notify(String notificationTitle, String notificationMessage){
      NotificationManager notificationManager = (NotificationManager) getSystemService(NOTIFICATION_SERVICE);
      @SuppressWarnings("deprecation")

      Notification notification = new Notification(R.drawable.abc,"New Message", System.currentTimeMillis());
      Intent notificationIntent = new Intent(this,NotificationView.class);
      PendingIntent pendingIntent = PendingIntent.getActivity(this, 0,notificationIntent, 0);

      notification.setLatestEventInfo(MainActivity.this, notificationTitle,notificationMessage, pendingIntent);
      notificationManager.notify(9999, notification);
   }

   @Override
   public boolean onCreateOptionsMenu(Menu menu) {
      // Inflate the menu; this adds items to the action bar if it is present.
      getMenuInflater().inflate(R.menu.menu_main, menu);
      return true;
   }

   @Override
   public boolean onOptionsItemSelected(MenuItem item) {
      // Handle action bar item clicks here. The action bar will
      // automatically handle clicks on the Home/Up button, so long
      // as you specify a parent activity in AndroidManifest.xml.

      int id = item.getItemId();

      //noinspection SimplifiableIfStatement
      if (id == R.id.action_settings) {
         return true;
      }
      return super.onOptionsItemSelected(item);
   }
}
Sau đây là nội dung của res/layout/notification.xml file:
<?xml version="1.0" encoding="utf-8"?>
<LinearLayout xmlns:android="http://schemas.android.com/apk/res/android"
   android:orientation="vertical"
   android:layout_width="fill_parent"
   android:layout_height="fill_parent" >

   <TextView
      android:layout_width="fill_parent"
      android:layout_height="400dp"
      android:text="Hi, Your Detailed notification view goes here...." />
</LinearLayout>
Sau đây là nội dung của Main Activity file đã được sửa đổi: src/com.example.notificationdemo/NotificationView.java.
package com.example.notificationdemo;

import android.os.Bundle;
import android.app.Activity;

public class NotificationView extends Activity{
   @Override
   public void onCreate(Bundle savedInstanceState){
      super.onCreate(savedInstanceState);
      setContentView(R.layout.notification);
   }
}
Sau đây là nội dung của res/layout/activity_main.xml file −
<RelativeLayout xmlns:android="http://schemas.android.com/apk/res/android"
   xmlns:tools="http://schemas.android.com/tools"
   android:layout_width="match_parent"
   android:layout_height="match_parent"
   android:paddingBottom="@dimen/activity_vertical_margin"
   android:paddingLeft="@dimen/activity_horizontal_margin"
   android:paddingRight="@dimen/activity_horizontal_margin"
   android:paddingTop="@dimen/activity_vertical_margin"
   tools:context="MainActivity">

   <TextView
      android:id="@+id/textView1"
      android:layout_width="wrap_content"
      android:layout_height="wrap_content"
      android:text="Notification Example"
      android:layout_alignParentTop="true"
      android:layout_centerHorizontal="true"
      android:textSize="30dp" />

   <TextView
      android:id="@+id/textView2"
      android:layout_width="wrap_content"
      android:layout_height="wrap_content"
      android:text="Tutorials point "
      android:textColor="#ff87ff09"
      android:textSize="30dp"
      android:layout_below="@+id/textView1"
      android:layout_centerHorizontal="true"
      android:layout_marginTop="48dp" />

   <ImageButton
      android:layout_width="wrap_content"
      android:layout_height="wrap_content"
      android:id="@+id/imageButton"
      android:src="@drawable/abc"
      android:layout_below="@+id/textView2"
      android:layout_centerHorizontal="true"
      android:layout_marginTop="42dp" />

   <Button
      android:layout_width="wrap_content"
      android:layout_height="wrap_content"
      android:text="Notification"
      android:id="@+id/button"
      android:layout_marginTop="62dp"
      android:layout_below="@+id/imageButton"
      android:layout_centerHorizontal="true" />

</RelativeLayout>
Sau đây là nội dung của res/values/strings.xml để định nghĩa hai hằng −
<?xml version="1.0" encoding="utf-8"?>
<resources>
   <string name="action_settings">Settings</string>
   <string name="app_name">tutorialspoint </string>
</resources>
Sau đây là nội dung mặc định của AndroidManifest.xml −
<?xml version="1.0" encoding="utf-8"?>
<manifest xmlns:android="http://schemas.android.com/apk/res/android"
   package="com.example.notificationdemo"
   android:versionCode="1"
   android:versionName="1.0" >

   <application
      android:allowBackup="true"
      android:icon="@drawable/ic_launcher"
      android:label="@string/app_name"
      android:theme="@style/AppTheme" >

      <activity
         android:name="com.example.notificationdemo.MainActivity"
         android:label="@string/app_name" >

         <intent-filter>
            <action android:name="android.intent.action.MAIN" />
            <category android:name="android.intent.category.LAUNCHER" />
         </intent-filter>

      </activity>

      <activity android:name=".NotificationView"
         android:label="Details of notification"
         android:parentActivityName=".MainActivity">
         <meta-data
         android:name="android.support.PARENT_ACTIVITY"
         android:value=".MainActivity"/>
      </activity>

   </application>
</manifest>
Cuối cùng, bạn chạy ứng dụng Android vừa tạo ở trên.
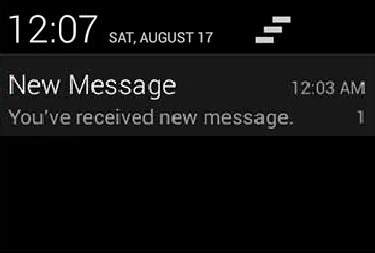
Bây giờ click vào nút, bạn sẽ thấy một thông điệp ở trên cùng "New Message Alert!" sẽ hiển thị ngay tức khắc và sau đó bạn sẽ có màn hình sau với một icon nhỏ tại góc trên cùng bên trái.
Mở rộng view này, long click vào icon đó, sau một giây nó sẽ hiển thị thông tin date và đây là lúc bạn nên kéo status bar xuống. Bạn sẽ thấy thanh trạng thái mở rộng và có mà hình sau: −
Big View Notification
Code sau minh họa cách để hiệu chỉnh thông báo đã được tạo trong ví dụ trước để sử dụng một style là big view. Mình cập nhật phương thức displayNotification() để hiển thị tính năng này:−
protected void displayNotification() {
   Log.i("Start", "notification");

   /* Invoking the default notification service */
   NotificationCompat.Builder  mBuilder = new NotificationCompat.Builder(this);

   mBuilder.setContentTitle("New Message");
   mBuilder.setContentText("You've received new message.");
   mBuilder.setTicker("New Message Alert!");
   mBuilder.setSmallIcon(R.drawable.woman);

   /* Increase notification number every time a new notification arrives */
   mBuilder.setNumber(++numMessages);

   /* Add Big View Specific Configuration */
   NotificationCompat.InboxStyle inboxStyle = new NotificationCompat.InboxStyle();

   String[] events = new String[6];
   events[0] = new String("This is first line....");
   events[1] = new String("This is second line...");
   events[2] = new String("This is third line...");
   events[3] = new String("This is 4th line...");
   events[4] = new String("This is 5th line...");
   events[5] = new String("This is 6th line...");

   // Sets a title for the Inbox style big view
   inboxStyle.setBigContentTitle("Big Title Details:");

   // Moves events into the big view
   for (int i=0; i < events.length; i++) {
      inboxStyle.addLine(events[i]);
   }

   mBuilder.setStyle(inboxStyle);

   /* Creates an explicit intent for an Activity in your app */
   Intent resultIntent = new Intent(this, NotificationView.class);

   TaskStackBuilder stackBuilder = TaskStackBuilder.create(this);
   stackBuilder.addParentStack(NotificationView.class);

   /* Adds the Intent that starts the Activity to the top of the stack */
   stackBuilder.addNextIntent(resultIntent);
   PendingIntent resultPendingIntent =stackBuilder.getPendingIntent(0,PendingIntent.FLAG_UPDATE_CURRENT);

   mBuilder.setContentIntent(resultPendingIntent);
   mNotificationManager = (NotificationManager) getSystemService(Context.NOTIFICATION_SERVICE);

   /* notificationID allows you to update the notification later on. */
   mNotificationManager.notify(notificationID, mBuilder.build());
}
Bây giờ, thử chạy ứng dụng trên, bạn sẽ thấy kết quả hiển thị trong form đã được mở rộng. −

Đã có app VietJack trên điện thoại, giải bài tập SGK, SBT Soạn văn, Văn mẫu, Thi online, Bài giảng....miễn phí. Tải ngay ứng dụng trên Android và iOS.


Các bạn có thể mua thêm khóa học JAVA CORE ONLINE VÀ ỨNG DỤNG cực hay, giúp các bạn vượt qua các dự án trên trường và đi thực tập Java. Khóa học có giá chỉ 300K, nhằm ưu đãi, tạo điều kiện cho sinh viên cho thể mua khóa học.
Nội dung khóa học gồm 16 chuơng và 100 video cực hay, học trực tiếp tại https://www.udemy.com/tu-tin-di-lam-voi-kien-thuc-ve-java-core-toan-tap/ Bạn nào có nhu cầu mua, inbox trực tiếp a Tuyền, cựu sinh viên Bách Khoa K53, fb: https://www.facebook.com/tuyen.vietjack
Follow facebook cá nhân Nguyễn Thanh Tuyền https://www.facebook.com/tuyen.vietjack để tiếp tục theo dõi các loạt bài mới nhất về Java,C,C++,Javascript,HTML,Python,Database,Mobile.... mới nhất của chúng tôi.
Bài học Angular phổ biến tại vietjack.com:


 Giải bài tập SGK & SBT
 Tài liệu giáo viên
 Sách
Sách
 Khóa học
 Thi online
 Hỏi đáp