
Service trong Android
Một Service là một thành phần mà chạy trong Background để thực hiện các hoạt động mà không cần tương tác với người dùng và nó làm việc ngay cả khi nếu ứng dụng bị hủy. Về cơ bản, một Service nhận hai trạng thái: −
| Trạng thái | Miêu tả |
|---|---|
| Started | Một Service được bắt đầu (started) khi một Component, chẳng hạn như activity, bắt đầu bằng việc gọi startService(). Khi đã được bắt đầu, một Service có thể chạy ngầm định trong Background, ngay cả khi thành phần mà bắt đầu nó đã bị hủy |
| Bound | Một Service được gắn kết (bound) khi một Component kết nối tới nó bởi việc gọi bindService(). Một bound service cung cấp một giao diện Client-Server cho phép các thành phần để tương tác với Service đó, gửi yêu cầu, nhận kết quả, và có thể thực hiện một số tiên trình khác với Interprocess Communication (IPC) |
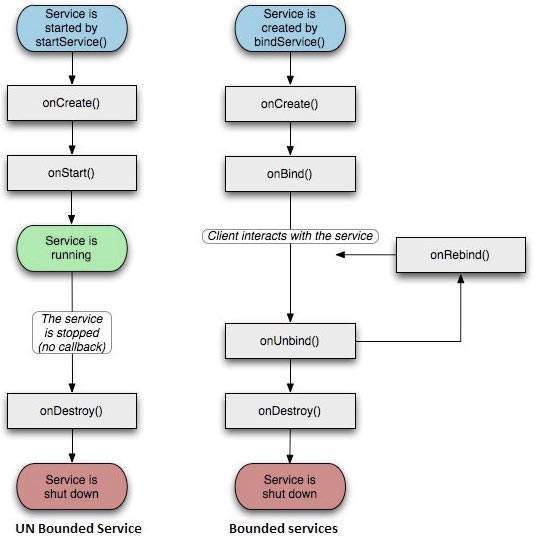
Một Service có các phương thức callback mà bạn có thể triển khai để giám sát các thay đổi trong trạng thái của Service và bạn có thể thực hiện công việc trên các giai đoạn cụ thể. Sơ đồ bên trái minh họa vòng đời của Service khi Service được tạo với phương thức startService() và sơ đồ bên phải minh họa vòng đời Service khi Service được tạo với bindService():
Để tạo một Service, bạn tạo một lớp Java mà kế thừa lớp cơ sở Service hoặc một trong các lớp con đang tồn tại của nó. Lớp cơ sở Service định nghĩa các phương thức callback đa dạng và các phương thức quan trọng nhất được liệt kê dưới đây. Bạn không cần triển khai toàn bộ chúng. Điều quan trọng là bạn hiểu từng phương thức và cách triển khai chúng để đảm bảo ứng dụng của bạn vận hành như người dùng mong đợi.
| Callback | Miêu tả |
|---|---|
| onStartCommand() | Hệ thống gọi phương thức này khi thành phần khác, chẳng hạn một activity, yêu cầu rằng Service bắt đầu, bằng việc gọi startService(). Nếu bạn triển khai phương thức này, thì bạn cũng cần dừng nó khi công việc đã được thực hiện, bằng cách gọi phương thức stopSelf() hoặc stopService() |
| onBind() | Hệ thống gọi phương thức này khi thành phần khác muốn liên kết với Service bởi gọi bindService(). Nếu bạn triển khai phương thức này, bạn phải cung cấp một giao diện mà client sử dụng để giao tiếp với Service đó, bằng việc trả về một đối tượng IBinder. Bạn phải luôn luôn triển khai phương thức này, nếu bạn không muốn cho phép liên kết, thì bạn nên trả về null. |
| onUnbind() | Hệ thống gọi phương thức này khi tất cả client đã bị ngắt kết nối với một giao diện nào đó đã được công bố bởi Service này |
| onRebind() | Hệ thống gọi phương thức này khi client mới đã kết nối tới Service này, sau khi nó đã được thông báo trước đó rằng tất cả đã bị ngắt kết nối trong phương thức onUnbind(Intent) của nó . |
| onCreate() | Hệ thống gọi phương thức này khi Service là được tạo đầu tiên bởi sử dụng onStartCommand() hoặc onBind(). Lời gọi này là cần thiết để thực hiện cài đặt one-time |
| onDestroy() | Hệ thống gọi phương thức này khi Service không còn được sử dụng nữa và đang bị hủy. Service của bạn nên triển khai phương thức này để xóa bất cứ Resource nào như thread, registered listener, receiver, ... |
Ví dụ sau minh họa vòng đời của mỗi phương thức của một Service: −
package com.tutorialspoint;

import android.app.Service;
import android.os.IBinder;
import android.content.Intent;
import android.os.Bundle;

public class HelloService extends Service {

   /** indicates how to behave if the service is killed */
   int mStartMode;

   /** interface for clients that bind */
   IBinder mBinder;

   /** indicates whether onRebind should be used */
   boolean mAllowRebind;

   /** Called when the service is being created. */
   @Override
   public void onCreate() {

   }

   /** The service is starting, due to a call to startService() */
   @Override
   public int onStartCommand(Intent intent, int flags, int startId) {
      return mStartMode;
   }

   /** A client is binding to the service with bindService() */
   @Override
   public IBinder onBind(Intent intent) {
      return mBinder;
   }

   /** Called when all clients have unbound with unbindService() */
   @Override
   public boolean onUnbind(Intent intent) {
      return mAllowRebind;
   }

   /** Called when a client is binding to the service with bindService()*/
   @Override
   public void onRebind(Intent intent) {

   }

   /** Called when The service is no longer used and is being destroyed */
   @Override
   public void onDestroy() {

   }
}
Ví dụ
Ví dụ sau sẽ đưa bạn qua các bước đơn giản để minh họa cách tạo Service riêng cho ứng dụng Android của bạn. Sau đây là các bước để sửa đổi ứng dụng Hello World đã tạo ở chương Ví dụ Hello World.
| Bước | Miêu tả |
|---|---|
| 1 | Sử dụng Android StudioIDE để tạo một ứng dụng Android và đặt tên nó là My Application dưới một package là com.example.My Application đã được giải thích trong chương Ví dụ Hello World |
| 2 | Sửa đổi MainActivity.java để thêm phương thức startService() và phương thức stopService() |
| 3 | Tạo một MyService.java mới dưới package là com.example.My Application. File này sẽ có trình triển khai của các phương thức liên quan tới Android Service |
| 4 | Định nghĩa Service của bạn trong AndroidManifest.xml bởi sử dụng thẻ <service.../> Một ứng dụng có thể có một hoặc nhiều Service mà không có bất cứ hạn chế nào. |
| 5 | Sửa đổi nội dung mặc định của res/layout/activity_main.xml file để bao hai button trong linear layout |
| 6 | Không cần thiết thay đổi bất cứ hằng nào trong res/values/strings.xml file. Android Studio sẽ để ý các giá trị chuỗi đó |
| 7 | Chạy ứng dụng để chạy Android Emulator và kiểm tra kết quả các thay đổi đã thực hiện trong ứng dụng này |
Sau đây là nội dung của Main Activity file đã được sửa đổi: src/com.example.My Application/MainActivity.java. . We have added startService() and stopService() methods to start and stop the service.
package com.example.My Application;

import android.os.Bundle;
import android.app.Activity;
import android.view.Menu;
import android.content.Intent;
import android.view.View;

public class MainActivity extends Activity {

   @Override
   public void onCreate(Bundle savedInstanceState) {
      super.onCreate(savedInstanceState);
      setContentView(R.layout.activity_main);
   }

   @Override
   public boolean onCreateOptionsMenu(Menu menu) {
      getMenuInflater().inflate(R.menu.activity_main, menu);
      return true;
   }

   // Method to start the service
   public void startService(View view) {
      startService(new Intent(getBaseContext(), MyService.class));
   }

   // Method to stop the service
   public void stopService(View view) {
      stopService(new Intent(getBaseContext(), MyService.class));
   }
}
Sau đây là nội dung của src/com.example.My Application/MyService.java. File này có thể có trình triển khai của một hoặc nhiều phương thức được gắn kết với Service tùy theo yêu cầu. Bây giờ, chúng ta đang triển khai chỉ hai phương thức là onStartCommand() và onDestroy() −
package com.example.My Application;

import android.app.Service;
import android.content.Intent;
import android.os.IBinder;
import android.widget.Toast;

public class MyService extends Service {

   @Override
   public IBinder onBind(Intent arg0) {
      return null;
   }

   @Override
   public int onStartCommand(Intent intent, int flags, int startId) {
      // Let it continue running until it is stopped.
      Toast.makeText(this, "Service Started", Toast.LENGTH_LONG).show();
      return START_STICKY;
   }

   @Override
   public void onDestroy() {
      super.onDestroy();
      Toast.makeText(this, "Service Destroyed", Toast.LENGTH_LONG).show();
   }
}
Còn đây là nội dung đã được sửa đổi của AndroidManifest.xml Ở đây, chúng ta đã thêm thẻ <service.../> để bao Service của chúng ta:
<manifest xmlns:android="http://schemas.android.com/apk/res/android"
   package="com.example.MyApplication"
   android:versionCode="1"
   android:versionName="1.0" >

   <uses-sdk
      android:minSdkVersion="13"
      android:targetSdkVersion="22" />

   <application
       android:icon="@drawable/ic_launcher"
       android:label="@string/app_name"
       android:theme="@style/AppTheme" >

       <activity
          android:name=".MainActivity"
          android:label="@string/title_activity_main" >

          <intent-filter>
             <action android:name="android.intent.action.MAIN" />
             <category android:name="android.intent.category.LAUNCHER"/>
          </intent-filter>

       </activity>

       <service android:name=".MyService" />

   </application>
</manifest>
Đây sẽ là nội dung của res/layout/activity_main.xml file để bao hai nút:
<RelativeLayout xmlns:android="http://schemas.android.com/apk/res/android"
   xmlns:tools="http://schemas.android.com/tools" android:layout_width="match_parent"
   android:layout_height="match_parent" android:paddingLeft="@dimen/activity_horizontal_margin"
   android:paddingRight="@dimen/activity_horizontal_margin"
   android:paddingTop="@dimen/activity_vertical_margin"
   android:paddingBottom="@dimen/activity_vertical_margin" tools:context=".MainActivity">

   <TextView
      android:id="@+id/textView1"
      android:layout_width="wrap_content"
      android:layout_height="wrap_content"
      android:text="Example of services"
      android:layout_alignParentTop="true"
      android:layout_centerHorizontal="true"
      android:textSize="30dp" />

      <TextView
         android:id="@+id/textView2"
         android:layout_width="wrap_content"
         android:layout_height="wrap_content"
         android:text="Tutorials point "
         android:textColor="#ff87ff09"
         android:textSize="30dp"
         android:layout_above="@+id/imageButton"
         android:layout_centerHorizontal="true"
         android:layout_marginBottom="40dp" />

    <ImageButton
        android:layout_width="wrap_content"
        android:layout_height="wrap_content"
        android:id="@+id/imageButton"
        android:src="@drawable/abc"
        android:layout_centerVertical="true"
        android:layout_centerHorizontal="true" />

    <Button
        android:layout_width="wrap_content"
        android:layout_height="wrap_content"
        android:id="@+id/button2"
        android:text="Start Services"
        android:onClick="startService"
        android:layout_below="@+id/imageButton"
        android:layout_centerHorizontal="true" />

    <Button
        android:layout_width="wrap_content"
        android:layout_height="wrap_content"
        android:text="Stop Services"
        android:id="@+id/button"
        android:onClick="stopService"
        android:layout_below="@+id/button2"
        android:layout_alignLeft="@+id/button2"
        android:layout_alignStart="@+id/button2"
        android:layout_alignRight="@+id/button2"
        android:layout_alignEnd="@+id/button2" />

</RelativeLayout>
Và nội dung của res/values/strings.xml để định nghĩa hai hằng mới là:
<resources>
    <string name="app_name">My Application</string>
    <string name="menu_settings">Settings</string>
    <string name="title_activity_main">MainActivity</string>
</resources>
Bây giờ, chạy ứng dụng Hello World!đã sửa trên. Giả sử bạn đã tạo AVD trong khi cài đặt. Để chạy ứng dụng từ Android Studio, mở activity file của project và nhấn vào biểu tượng Run  từ thanh công cụ. Android Studio đặt ứng dụng trên AVD và bắt đầu nó. Nếu mọi thứ là ổn, nó sẽ hiển thị cửa sổ Emulator sau: −
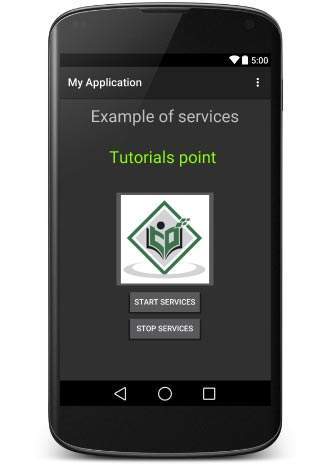
Để bắt đầu dịch vụ, bạn nhấn nút Start Service , việc này sẽ bắt đầu Service và theo như lập trình trong phương thức onStartCommand() một thông điệp Service Started sẽ xuất hiện ở cuối hình minh họa, như sau: −

Để dừng Service, bạn có thể nhấn nút Stop Service.
Đã có app VietJack trên điện thoại, giải bài tập SGK, SBT Soạn văn, Văn mẫu, Thi online, Bài giảng....miễn phí. Tải ngay ứng dụng trên Android và iOS.


Các bạn có thể mua thêm khóa học JAVA CORE ONLINE VÀ ỨNG DỤNG cực hay, giúp các bạn vượt qua các dự án trên trường và đi thực tập Java. Khóa học có giá chỉ 300K, nhằm ưu đãi, tạo điều kiện cho sinh viên cho thể mua khóa học.
Nội dung khóa học gồm 16 chuơng và 100 video cực hay, học trực tiếp tại https://www.udemy.com/tu-tin-di-lam-voi-kien-thuc-ve-java-core-toan-tap/ Bạn nào có nhu cầu mua, inbox trực tiếp a Tuyền, cựu sinh viên Bách Khoa K53, fb: https://www.facebook.com/tuyen.vietjack
Follow facebook cá nhân Nguyễn Thanh Tuyền https://www.facebook.com/tuyen.vietjack để tiếp tục theo dõi các loạt bài mới nhất về Java,C,C++,Javascript,HTML,Python,Database,Mobile.... mới nhất của chúng tôi.
Bài học Angular phổ biến tại vietjack.com:


 Giải bài tập SGK & SBT
 Tài liệu giáo viên
 Sách
Sách
 Khóa học
 Thi online
 Hỏi đáp